
Over time, water leaks can cause serious structural damage to your ceiling drywall in Great Falls, VA. You may notice sagging, discoloration, or even mold growth-dangerous signs that demand immediate attention. Prompt, professional repair not only restores your ceiling’s appearance but also protects your home’s long-term integrity and indoor air quality.

Key Takeaways:
- Water leaks in Great Falls homes often cause ceiling drywall damage that requires prompt repair to prevent mold growth and structural weakening.
- Professional assessment is recommended to identify hidden moisture and ensure proper drying before patching or replacing damaged drywall.
- Matching texture and paint on repaired ceilings can be challenging, so hiring experienced local contractors improves the likelihood of an invisible fix.
The Signs of the Leak
Spotting water damage early can save you from costly ceiling drywall repair in Great Falls, VA. Look for discoloration, sagging, or bubbling paint-these are clear indicators of moisture intrusion. Ignoring these signs risks structural damage and mold growth, so act quickly when you notice changes.
The yellow circle
Yellow or brown stains on your ceiling often mark where water has seeped through. This ring-like discoloration usually starts small but spreads over time. A yellow circle means moisture is actively compromising your drywall, requiring immediate inspection.
The smell of damp
A musty odor in a room with no obvious source often points to hidden water damage. This smell develops when moisture becomes trapped behind drywall or insulation. That damp scent can signal mold growth, even before visible signs appear.
Mold thrives in dark, moist environments, and your ceiling cavity offers the perfect breeding ground. If you catch that earthy, damp smell lingering near the ceiling, don’t dismiss it. Early mold can compromise indoor air quality and lead to health concerns, especially for those with allergies or respiratory conditions. A professional assessment ensures safe, complete remediation.
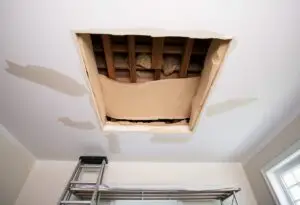
Removing the Rotten Board
Start by cutting out the damaged drywall with precision to prevent further structural compromise. Use a utility knife to score along stud lines, ensuring clean edges for the new patch. Water-damaged drywall loses integrity, so never attempt to patch without full removal. This step sets the foundation for a lasting repair.
The sharp knife
A sharp utility knife gives you control and accuracy when outlining the damaged section. Dull blades tear the paper face, worsening the damage. Clean, deliberate cuts minimize dust and prevent unnecessary expansion of the hole. Always change blades frequently for optimal performance.
Clearing the debris
Remove all loose material from the opening, including crumbling gypsum and soaked insulation. Failing to clear debris leads to poor adhesion and mold risks. Use a vacuum with a HEPA filter to capture fine particles and keep the work area safe and clean.
After cutting out the damaged section, take time to inspect the cavity above. Moisture often spreads beyond visible damage, affecting insulation and wood framing. Hidden mold or lingering dampness can trigger health issues and future deterioration. Wipe joists with a dry cloth and allow the area to air out before proceeding-this ensures a dry, stable surface for the new drywall installation.
Fixing the Source
Every ceiling drywall repair in Great Falls, VA starts with stopping the leak. Water will keep damaging your home until the source is fully addressed. Ignoring this step risks mold growth and structural weakening, so identifying and fixing the origin is non-negotiable for lasting results.
The roof shingles
Roof shingles often fail after harsh weather, letting water seep into your attic and down to the ceiling. You’ll notice dark stains or sagging drywall directly below affected areas. Replacing damaged shingles promptly prevents further interior harm and protects your home’s integrity.
The broken pipe
Broken pipes hide behind walls or above ceilings, leaking steadily and saturating drywall. You might hear dripping or see sudden discoloration without weather-related cause. Immediate shutoff and pipe repair are crucial to stop ongoing water exposure and prevent mold.
When a broken pipe is the culprit, time is not on your side. The longer water flows, even in small amounts, the more it weakens ceiling joists and promotes dangerous mold colonies within 24 to 48 hours. You need a licensed plumber to locate and repair the break, followed by professional drying and drywall restoration to ensure safety and durability.
Fitting the New Patch
Proper alignment ensures a smooth finish. Hold the drywall patch in place over the repaired area, making sure it sits flush with the surrounding surface. Any gaps or uneven edges will show through the paint, so take time to position it correctly before securing it permanently.
Measuring the gap
Use a tape measure to determine the exact dimensions of the damaged section. Mark these measurements on your replacement drywall piece with a pencil. Accuracy prevents misfits and reduces the need for adjustments during installation.
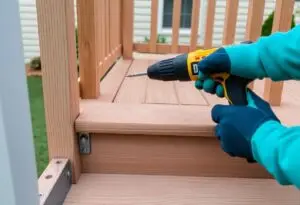
Driving the screws
Start by placing screws around the perimeter of the patch, spacing them about 6 to 8 inches apart. Sink each screw just deep enough to dimple the surface without tearing the paper. Overdriving can weaken the patch and lead to cracks later on.
Drive each screw with a drywall screw gun or a drill fitted with a depth stop to maintain consistent penetration. Position fasteners slightly away from the edges to prevent crumbling. Properly seated screws provide secure attachment and a stable base for taping and mudding, ensuring a durable, long-lasting repair.
The Art of the Mud
Mastering drywall repair means understanding how joint compound behaves. You’ll apply it in layers, letting each dry fully before continuing. Patience here prevents cracks and shrinkage, ensuring a lasting finish that blends seamlessly with surrounding walls.
Spreading the compound
Apply the first layer of joint compound with steady pressure using a drywall knife. Keep the edge clean and smooth to avoid ridges. Feather the outer edges so the repair fades into the existing surface.
Sanding it flat
Once the compound dries, sand it gently with a pole sander or hand block. Over-sanding can damage the paper face of the drywall, so use light, even strokes. A flat, smooth surface ensures a professional result.
Use a bright work light angled across the surface to reveal imperfections invisible under normal lighting. This technique shows high spots and valleys clearly. Always wear a respirator and eye protection-drywall dust is harmful when inhaled. Sand progressively with finer grits for the smoothest finish before priming.
The Final Paint
Paint seals your repaired ceiling and brings it back to life. A clean, even coat hides all signs of past water damage and blends the patch with surrounding areas. Your choice of finish affects both appearance and durability-especially important in areas previously damaged by leaks.
Choosing the white
You need the right shade of white to match your existing ceiling. Even slight differences become obvious under overhead light. Using leftover paint from the original job ensures perfect consistency, but if unavailable, bring a sample to a local store for precise color-matching.
Rolling the surface
Start rolling from the center and work outward to avoid lap marks. Use a low-nap roller for a smooth finish that mimics most ceilings. Overlapping slightly with each pass ensures even coverage and prevents streaks that draw attention to the repair.
Apply paint in thin, even layers to maintain a uniform texture. Thick paint can drip or create visible ridges, especially on taped seams or filled areas. Let the first coat dry completely before assessing if a second is needed-most repairs benefit from two light coats rather than one heavy one. Keep your roller loaded consistently to avoid uneven sheen.
Summing up
You need prompt, professional ceiling drywall repair in Great Falls, VA after leaks to prevent further damage and maintain your home’s integrity. Water compromises structural strength and invites mold. A qualified contractor assesses the extent, replaces damaged sections, and ensures seamless finishing. Addressing the issue quickly protects your investment and restores safety and comfort to your living space.