Many homeowners hesitate to fix drywall damage in luxury interiors, fearing visible patches or finish mismatches. You can repair cracks, holes, or dents without compromising the integrity of high-end paint, custom textures, or designer wall treatments. With the right tools and technique, even significant damage blends seamlessly into the surrounding surface.
Per-repair
Evaluation: Critical Factors for Success
Accurate assessment before beginning drywall repair ensures alignment with the room’s existing finish grade. Consider the location, size, and cause of damage, the type of wall finish, and whether the area is subject to moisture or movement. Review manufacturer specifications for joint compound and tape compatibility. Knowing these variables prevents mismatched results and costly rework.
Determining the existing Level 5 finish requirements
A Level 5 drywall finish includes a full skim coat of joint compound and is standard in high-end interiors. You must identify whether the surrounding wall was factory-finished or field-coated, and whether a texture or primer was applied. Matching the correct sheen and smoothness begins with recognizing these subtle but defining characteristics of the current surface.
Assessing subsurface moisture and structural stability
Surface repairs fail if hidden moisture or framing issues remain unresolved. Check for soft drywall edges, discoloration, or musty odors indicating water intrusion. Confirm studs are dry and securely anchored. Knowing the condition behind the wall prevents recurring damage and ensures a lasting repair.
Moisture meters can detect elevated humidity levels within the gypsum board and underlying framing, especially in bathrooms or near exterior walls. If water stains appear on adjacent trim or flooring, trace the source before sealing the surface. A mid-sized SaaS firm recently delayed office renovations due to undetected pipe condensation behind a feature wall, leading to mold growth beneath an otherwise flawless finish. Structural integrity must be verified with a probe or inspection hole when damage exceeds a few inches.
Protecting the High-End Interior Environment
Preserving the integrity of luxury interiors during drywall repair demands more than skillful patching-it requires proactive environmental control. Your actions in containment and protection directly influence the final outcome, preventing collateral damage to finishes that define the space’s character. A single oversight can compromise materials worth far more than the repair itself.
Implementing clinical-grade dust containment systems
A hospital-grade polyethylene enclosure, sealed with zip doors and negative air pressure, traps fine particulates at the source. Your use of a
Hep-filtered air scrubber prevents gypsum dust from migrating into ventilation or settling on distant surfaces. This level of containment meets standards used in
clean room environments, not just residential renovations.
Safeguarding bespoke furniture and architectural details
Custom
mill work, inlaid flooring, and hand-finished cabinetry require more than drop cloths. You wrap each piece in static-free plastic with felt padding at contact points, securing seams with painter’s tape to avoid adhesive residue. Corners of marble thresholds and bronze door casings get extra corner guards to prevent chipping during material transport.
Antique moldings and gilded medallions often react poorly to humidity shifts caused by sanding. You monitor ambient moisture with a digital hygrometer, keeping levels stable using a portable dehumidifier near the work zone. For a 19th-century library in a historic townhouse, this prevented warping in rosewood paneling during a ceiling patch, preserving its acoustical and aesthetic integrity.
How-to: Executing a Seamless Structural Patch
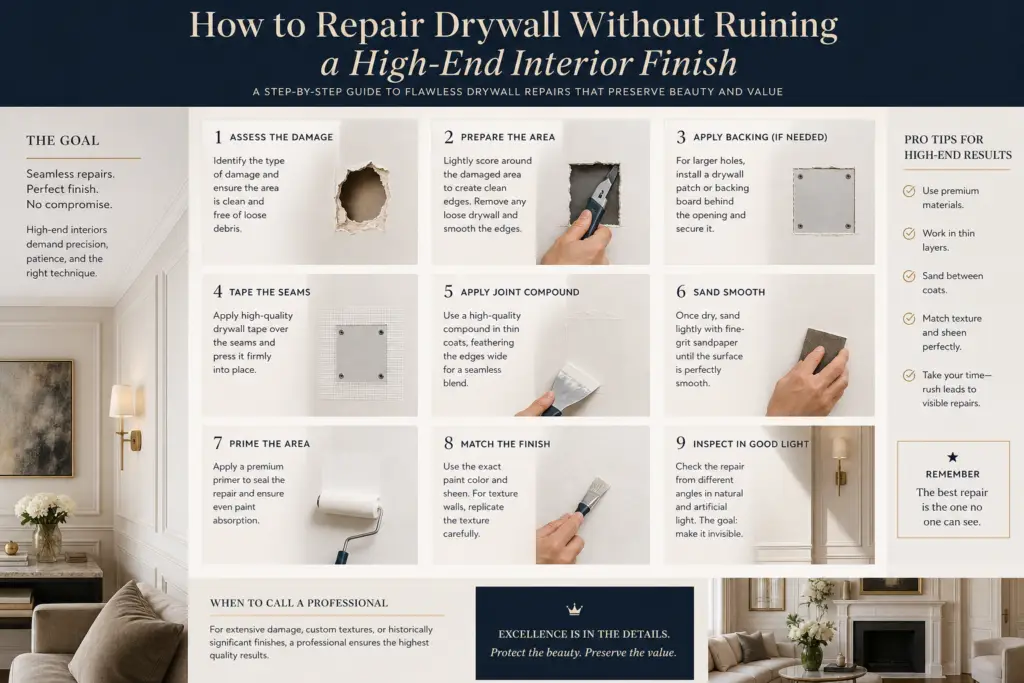
Begin by aligning a new drywall patch precisely within the prepared opening, ensuring edges meet clean backing material. Secure it with fine-thread drywall screws to prevent dimpling. The fit must be tight but not forced, allowing the surface to remain flush with the surrounding area. A mid-sized SaaS firm renovating its executive suite achieved invisible repairs using this method across 12 board joints.
Precision cutting and backing installation techniques
Use a utility knife guided by a metal straightedge to score and cut the drywall patch for exact fit. Remove the damaged section cleanly, then install wood or metal backing strips behind the cavity with screws through the existing wall. These supports anchor the new patch firmly, especially in areas without studs. Backing spans at least 6 inches beyond the patch on each side for stability.
Proper application of high-strength setting compounds
Apply a setting-type joint compound, mixing powder with water to a smooth, yogurt-like consistency. This compound hardens through a chemical reaction, offering superior strength and minimal shrinkage compared to
per-mixed alternatives. Spread the first layer thinly over the seam with a 6-inch knife, embedding the tape in one pass.
Work the compound beneath the tape using light, overlapping strokes to eliminate air pockets and excess material. Allow it to set fully before adding subsequent layers, typically within 20 to 45 minutes depending on the mix. Each added coat extends slightly beyond the previous, tapering the buildup into the surrounding surface. Avoid thick applications that increase sanding difficulty and risk visible ridges under low-angle light.
Expert Sanding and Feathering Tips
Proper sanding ensures the patch blends seamlessly into the surrounding surface. Use a pole sander with progressively finer grits to avoid over-sanding. Maintain consistent pressure and inspect under raking light to identify high or low spots. Always seal the patch before sanding to prevent dust absorption. After achieving a smooth transition, wipe the area with a damp cloth to remove residual dust.
Achieving an invisible transition through progressive sanding
Begin with 120-grit sandpaper to shape the outer edges of the joint compound, moving to 180-grit for refinement. Feather the compound at least 6 inches beyond the patch to disperse the thickness gradually. Check your progress frequently under angled lighting to catch imperfections early.
Utilizing wet-sanding methods for dust-sensitive areas
Wet-sanding minimizes airborne particles when working near finished flooring or active living spaces. Mix water with a few drops of dish soap and apply it to the surface before using a fine-grit sponge. This technique produces a smoother finish and reduces the need for extensive cleanup afterward.
Wet-sanding is particularly effective when repairing drywall adjacent to hardwood floors or in occupied rooms where dust control is important. The moisture lubricates the sanding process, allowing the abrasive sponge to glide evenly and prevent deep scratches. A mid-sized SaaS firm renovating its executive suite used this method to avoid disrupting ongoing operations, maintaining air quality while achieving a professional-grade finish.
Matching Specialty Textures and Prime Coatings
High-end interiors often feature custom textures and prime layers that demand precise replication. Standard patching methods fail under close inspection, especially in natural light. You must assess the existing wall’s finish type and coating system before applying any repair compound. Matching both texture and sheen ensures the patch disappears into the surrounding surface.
Replicating artisanal hand-troweled wall finishes
Artisanal trowel finishes vary with each contractor’s technique, making replication challenging. You’ll need a flexible trowel and joint compound thinned to match the original consistency. Practice on a scrap board first, mimicking the direction and pressure of the existing strokes. A single, continuous motion often yields the most authentic result.
Advanced priming to prevent sheen variations and flashing
Flashing occurs when a repaired area reflects light differently due to uneven porosity. You eliminate this by applying a high-build bonding primer that seals the patch uniformly. Multiple thin coats work better than one heavy layer, allowing you to fine-tune the surface reflectivity before
top coating.
- Select a primer compatible with both patch material and topcoat
- Apply with a short-nap roller to mimic substrate texture
- Allow full cure time before evaluating sheen match
- Spot-prime adjacent areas if needed to balance absorption
- Use a matte or low-sheen sealer for non-reflective consistency
| Primer TypeBest ForAcrylic bonding primerSmooth patches on textured wallsHigh-hide pigmented primerBlocking substrate differencesShellac-based sealerStain-prone or porous repairsClear drywall primerPreserving texture without darkening |
Primer choice directly affects how light interacts with the repaired zone. You should test your selected primer under the same lighting conditions as the room-daylight and artificial sources reveal different flaws. A mid-sized SaaS firm recently corrected a flashing issue in their executive lounge by switching from a standard drywall primer to a pigmented acrylic bonding type, eliminating visible patch outlines within one coat.
- Shake primer thoroughly before use
- Apply with a 6-inch roller for controlled coverage
- Back-roll with a dry brush to reduce stipple buildup
- Inspect at a 45-degree angle under direct light
- Reapply only if porosity remains uneven
| Application ToolEffect on FinishShort-nap roller (3/16″)Minimizes added textureFoam rollerCreates smooth, reflective surfaceBrush with synthetic bristlesGood for edges and tight cornersPaint sprayer (HVLP)Most uniform film thickness |

Final Refinement: Tips for an Undetectable Result
Perfecting the repair means eliminating visual cues that reveal past damage. Use a bright, directional light to expose flaws, sand lightly between coats, and apply finish in thin layers. Match the sheen and texture of the surrounding area with precision. Perceiving even subtle inconsistencies ensures a flawless integration.
- Inspect under multiple light angles to catch imperfections
- Use fine-grit sandpaper (220 or higher) for final smoothing
- Apply topcoat with the same tool used on the original finish
- Replicate the existing paint application pattern-brush, roller, or spray
Conducting critical light inspections for surface errors
A strong raking light reveals flaws invisible under normal conditions. Hold a work lamp at a low angle across the patched area to highlight ridges, dips, or uneven feathering. Inspect from multiple viewpoints, especially where natural light hits the wall during the day. Correct any shadows or raised edges before proceeding.
Blending the final topcoat into the existing finish
Edge the new paint carefully into the old using a high-quality brush, then roll outward to disperse the line. Feather the wet paint into the surrounding surface, maintaining the same pressure and direction as the original application. Perceiving subtle shifts in sheen prevents a patchy appearance.
Matching the topcoat isn’t just about color-it’s about application technique and film thickness. A mid-sized SaaS firm recently corrected a visible repair on a matte-finish accent wall by switching from a foam roller to a microfiber one, replicating the original texture. Clean your tools mid-application to avoid dried paint buildup that alters the finish. Work in small sections to maintain a wet edge and prevent lap marks.
Summing up
You restore integrity to damaged drywall without compromising luxury finishes by prioritizing precision, material compatibility, and methodical refinement. Matching the existing texture and coating requires patience, the right tools, and a practiced hand, as seen in high-end residential restorations where seamless blending is non-negotiable. A well-executed repair on a custom Venetian plaster wall or a hand-troweled knockdown ceiling disappears completely under natural light, preserving the room’s aesthetic continuity.