You can stop sagging doors from worsening by addressing loose hinges or worn strike plates early. Ignoring the issue may lead to misalignment, security risks, or costly repairs. With basic tools and proper adjustments, you can restore smooth operation and improve both function and safety in your Ashburn home.
Key Takeaways:
- Sagging doors in Ashburn homes are often caused by foundation settling or changes in humidity, both common due to the region’s clay-rich soil and seasonal climate shifts.
- Simple fixes like tightening hinge screws or replacing them with longer ones can restore proper alignment without the need for professional help.
- If the frame is misaligned or the door consistently drags, a licensed contractor may need to adjust the jamb or address underlying structural movement.
Primary Factors Behind Sagging Doors in Ashburn Homes
Multiple forces contribute to sagging doors in Ashburn residences.
- Humidity fluctuations cause wood to expand and contract
- Foundation settling shifts door frames out of alignment
- Worn hinges fail to support door weight over time
- Improper installation accelerates wear and misalignment
Any persistent door drag or sticking likely points to one of these underlying issues.
Impact of Northern Virginia Humidity and Temperature
Seasonal shifts in temperature and humidity directly affect your door’s alignment. Wood absorbs moisture in humid summers, swelling enough to bind in the frame. In dry winters, it contracts, creating gaps. These repeated cycles stress hinges and frames over time.
| Summer Conditions | High humidity causes wood expansion, leading to sticking |
| Winter Conditions | Dry air results in shrinkage, creating operational gaps |
Foundation Settling in Local Residential Developments
Many Ashburn homes experience slight foundation movement due to clay-rich soil and frequent freeze-thaw cycles. This settling distorts door frames, especially on exterior entries and upper levels. Misaligned jambs and uneven gaps are early signs.
Over time, the weight of your home compresses the underlying soil, particularly in newer developments where ground hasn’t fully compacted. When the foundation shifts even slightly, it pulls the framing out of square, causing doors to bind or not latch. This structural change won’t correct itself and often requires professional assessment to determine if stabilization is needed. Any persistent misalignment after hinge or frame adjustments should prompt a foundation inspection.
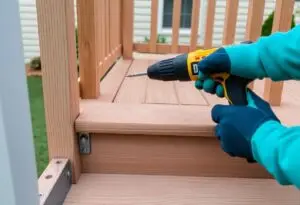
Essential Tools and Supplies for Door Repair
Every successful door repair starts with the right tools on hand. You’ll need long-reach screws, a drill, a screwdriver, a level, and shims to correct alignment. Skipping safety gear like gloves and eye protection puts you at unnecessary risk, so never overlook them. Having everything ready streamlines the job and ensures lasting results.
Selecting the Correct Long-Reach Screws
Choose screws at least 3 inches long to anchor into the wall stud behind the jamb. Standard screws often fail because they’re too short to reach solid support, leading to recurring sag. Opt for coated or stainless steel screws to resist corrosion, especially in Ashburn’s humid summers, ensuring a stronger, longer-lasting fix.
Necessary Hand Tools and Safety Equipment
Keep a claw hammer, adjustable wrench, and utility knife nearby for unexpected adjustments. Always wear safety glasses to shield your eyes from debris when drilling or prying. A sturdy work glove on your non-dominant hand protects against sharp edges and slipping tools, making the repair safer and more efficient.
Having the right hand tools means you’re prepared for small complications without interrupting your workflow. A properly sized drill bit prevents stripping screw heads, while a reliable level ensures your door hangs straight. Using damaged or dull tools increases the risk of injury and poor results, so inspect each item before starting. Your safety and the door’s performance depend on these details.
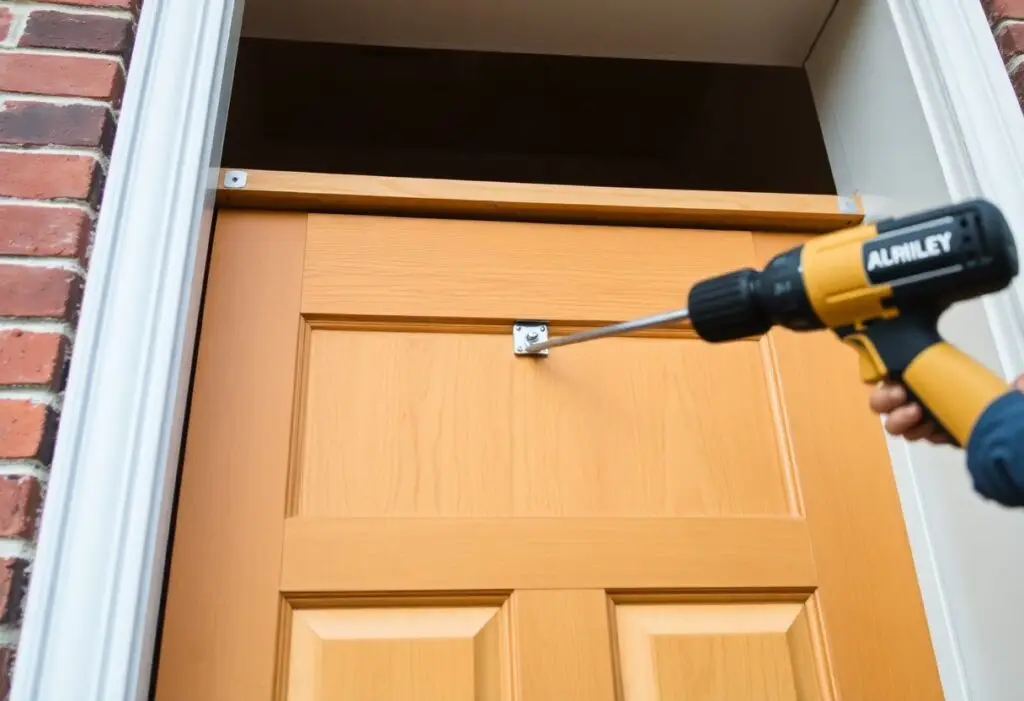
How-to Guide for Adjusting Loose Hinges
Start by checking each hinge screw with a screwdriver to identify looseness or stripping. Most sagging doors stem from weak hinge connections, especially on the top hinge. Tighten all screws securely, but avoid over-torquing, which can worsen damage. If the door shifts back into place after tightening, you’ve likely solved the issue without needing major repairs.
Tightening and Replacing Stripped Screw Holes
Remove the hinge and fill stripped holes with wooden toothpicks or dowels coated in wood glue. Let the glue cure fully before reinserting screws. This restores grip in the frame and prevents future loosening. Reattach the hinge firmly, ensuring alignment returns to normal.
Using Shims to Realign the Door Leaf
Slide thin wood shims behind the hinge plate to reposition the door vertically or horizontally. A properly placed shim corrects alignment instantly without permanent modifications. Secure the hinge over the shim, then trim any excess for a clean finish.
Shims offer a fast, reversible fix when the door sags due to frame settling-a common issue in older Ashburn homes with shifting foundations. You can buy door shims at any local hardware store or cut your own from scrap wood. After positioning the shim behind the hinge mortise, gently close the door to test the fit. When done right, the door operates smoothly and clears the threshold perfectly. This method avoids costly replacements and preserves original trim work.

Advanced Techniques for Frame Correction
When standard hinge adjustments don’t resolve the issue, frame correction becomes necessary to restore proper door function. This step addresses structural misalignment caused by house settling or poor initial installation. Only attempt these methods if the door continues to drag or bind after hinge and strike plate fixes.
- Assess frame plumb and level with a reliable spirit level
- Identify whether the jambs are twisted, racked, or out of plane
- Use shims behind hinge mortises to reposition the jamb correctly
- Secure misaligned sections with long screws into wall framing
- Recheck door swing and gap consistency after adjustments
| Technique | Best For |
|---|---|
| Shimming hinge recesses | Slight jamb misalignment |
| Frame realignment with long screws | Settling-related sagging |
| Jamb planing at contact points | Binding due to compression |
Deep Seating the Top Hinge for Better Clearance
You can gain extra clearance by deepening the top hinge mortise, allowing the entire door to sit slightly lower. Carefully chisel out additional wood from the jamb and door edge, ensuring the hinge sits flush. Over-cutting risks weakening the jamb, so remove material in small increments and test the fit often.
Strategic Sanding and Planing for Heavy Sagging
When the door drags at the bottom despite adjustments, targeted sanding or planing restores smooth operation. Focus only on the dragging corner or edge-typically the bottom latch side. Removing too much material creates a permanent gap, so work slowly and recheck clearance after each pass.
Start by marking the high-contact area with a pencil rub test-close the door gently to see where transfer occurs. Use a hand plane for precision on larger areas or a sanding block for minor touch-ups. Always plane or sand with the grain to avoid splintering, especially on solid wood doors common in Ashburn homes. Even 1/16 inch removed can resolve stubborn drag, so patience ensures a clean, professional result without compromising the door’s finish or fit.
Pro Tips for Maintaining Door Alignment
Keep your doors operating smoothly by checking hinge screws every few months.
- Tighten loose hinge screws with a screwdriver
- Replace stripped screws with longer construction-grade screws
- Inspect door frames for signs of warping or settling
- Adjust strike plates if latching becomes inconsistent
Perceiving small shifts early prevents costly repairs later.
Annual Lubrication of Hardware Components
Apply a silicone-based lubricant to hinges, latch bolts, and pivot points once a year. This simple act reduces friction and prevents rust, especially in Ashburn’s humid summers. Skipping this step can lead to stiff operation and premature wear. Perceiving resistance when opening or closing is your cue to act.
Monitoring Weatherstripping Integrity
Examine the weatherstripping around your doors every fall. Look for cracks, gaps, or compression that no longer seals tightly. Damaged seals let in drafts, raise energy bills, and invite pests. Perceiving a draft near the door edge means it’s time to replace the strip.
Over time, temperature swings and UV exposure degrade rubber and foam weatherstripping, even in shaded areas. You might not notice the decline until your heating bill spikes or cold air rushes in. Replacing worn strips with durable vinyl or silicone versions ensures a consistent barrier. Proper sealing improves comfort and efficiency year-round. Perceiving even a slight gap can prevent long-term damage.
Final Words
Considering all points, you can effectively fix sagging doors in your Ashburn, VA home by identifying the root cause-loose hinges, structural shifts, or humidity effects-and applying targeted solutions like tightening screws, installing longer ones, or adjusting the frame. With careful assessment and simple tools, you restore both function and security to your doors.